This has been quite an adventure, this furniture renovation project! As with most “first times” the learning curve was high and the hurdles were many.
It all started with an innocent browse through kijiji, if there is such a thing as an “innocent” browse :). To tell the truth, I have to stay away from kijiji most days because I will ALWAYS find something that I
need to have. I am usually able to control my “urge to splurge”, but this time, I lost and kijiji won! But if you had come across this beauty, you would have snapped it up too – gee I’m glad I beat you to it! Because the result is
GORGEOUS!!!
Just to prolong the reveal, I’ll take you through my adventures. Of course, you could always just scroll to the end of the post, but you wouldn’t want to ruin the surprise, would you?
Lets start at the beginning:
Unfortunately the kijiji picture was out of focus, and I didn’t think to take a photo before I started the project with the hardware, but here is the pre-sanding picture:
I fell in love with the form and detail of this dresser. As you know, I am a huge fan of anything
celtic in nature, so the detail on the front sides won me over!
This dresser was accompanied by a bedside table in the same design and a mirror, which was made to match, but doesn’t really (that’s another project I’m still contemplating). I paid $150 for all three pieces. The dresser and bedside table were made by a company called “Drexel” in 1956 and are SOLID wood and VERY heavy! The drawers are all dovetailed and have solid wood bottoms. There is even solid wood between each row of drawers. It is one well built piece of furniture.

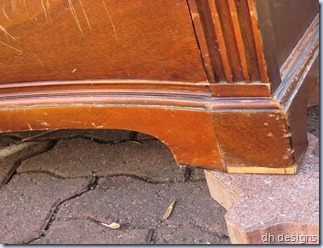
The dresser had a couple of areas that required attention. First was missing veneer on the feet. Then there were several deep scratches on the top and on the bottom drawer on the right side. The bedside table had some minor scratches and no damage on the veneer.
Last December (“Yes, December”, she said sheepishly) I set up the pieces on my patio and sanded them all in preparation for painting.
Next I had to wait for the warmer weather – and a *sigh* cleaned up garage. Well, hubby is as much a procrastinator as I am (and just a little bit of a hoarder - just a bit *rolling eyes*), along with being a very busy fellow, so this didn’t happen until Easter.
And then, we started renovating our upper floor including the bedroom where the dresser would reside. Summer hit and we seemed to have
NO free time at all. Seriously people, how does that happen??? (Note to selves – learn to say “NO”!)
Finally, in mid July all the stars were aligned and I could finally start my project. I set everything up in the garage, tarped off a section and covered anything that could get damaged by paint overspray.
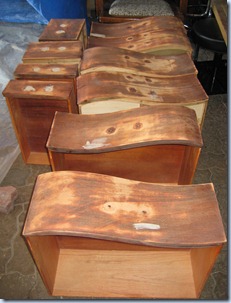
First off, I had to deal with the damage to the dresser. Sanding had helped some of the scratches, but it also resulted in some uneven surfaces. Also, thanks to
Design Ties’ Kelly, I had decided to switch the middle set of drawers to a single pull rather than the bail handles on the original piece, so the original holes needed to be closed up.
Armed with a tube of
Lepage’s Interior Tinted Wood Filler and a putty knife, I went to work and here’s how they looked when I was done:


More sanding and I was ready to paint. As I reported
here I chose a creamy base colour and an antique wash of a gold colour. And in
this post I told you about my infatuation with my new paint spray gun, which hasn’t abated by one iota!
The initial coat of paint using a “paint and primer in one” product was a great experience, but the result was very disappointing. Here’s a peek:


The problem was I had sanded through the stain layer to the raw wood, resulting with the stain bleeding through the paint. Back to the Home Improvement store I went (with the car on autopilot by now) and based on a recommendation from one of my hubby’s employees I picked up B.I.N. primer and sealer from Zinsser, and sprayed all of the pieces one more time.
Success! No more bleeding stain. One more coat of the base colour, CIL’s Antique White, and we were back in business! I sanded and sprayed the tops of both pieces one final time to get a smooth finish and I was ready to do my antique glaze.
I combined my glaze colour, CIL’s Brown Bag, with
Behr’s Faux Glaze product, gathered my cheesecloth rags, pulled up hubbys rolling mechanic’s seat and set to work. Here are the steps I used to achieve my antique finish:
- Using a clean paint brush and clean water, brush the area with water
- Using a separate paint brush and your glaze mixture, cover the same area with glaze
- Using a clean cheesecloth rag, rub the area in a circular fashion (where possible) until you achieve the coverage and colour you are looking for
- Move to the next area and repeat steps 1-3
In my case, I was looking for a light glaze over the solid areas, with more colour and definition in the detailed areas. In these areas, I used more than one coat of the glaze. It’s best to be lighter in your first coat. You can always reapply a second coat if you need more definition.
Next on the agenda was the hardware. This is the hardware that was on the piece:

Most of the hardware in the bedroom is pewter, so first I searched for new pewter hardware that was a little less ornate. There are three different sized hardware pieces on the dresser and bedside table, 3”, 3 1/2” and 4”. Finding 3” hardware wasn’t an issue, but the variety of hardware in other sizes was extremely low. I did find some online, but at price tags of $12-15 each, I thought I’d try to refinish the ones I had. I may revisit the hardware later, but for now, I went with what I had.
I searched the Home Improvement stores for spray paint in pewter. Nothing. Not one can of “Pewter” spray paint. Can you believe that? The closest I could find was a Stainless Steel finish from Tremclad. I tested the colour and finish on the hardware from the middle set of drawers that I wouldn’t be using. Here’s the result…
Pleasantly surprised, I sprayed all of the pieces:
For the centre drawers, I found a drawer pull that was a close match to the existing and had a celtic flair and sprayed them in the same colour.
And now….
FINALLY…. the dresser project is complete! Here, in photos, is the transformation (drum roll please):
After the first coat of “paint and primer”.
The bedside table after the B.I.N. Primer-Sealer coat.
After the antique glaze finish and in place in my bedroom.
And finally, the completed piece with hardware installed.
The pillows on the top of the dresser are from a giveaway I won over on the
Kerrisdale Design blog. They are a perfect fit for my new bedroom!
Next step is a piece of glass for the top of the dresser and I need to address the “mirror” issue. But, that’s a subject for another post. Right now, I’m heading upstairs to have another quick glimpse of my new dresser *sigh* ….
I am linking up this transformation to
Please take some time to head over to these great blogs to check out what other awesome bloggers have been up to!